문제의 시작
Scale-to-zero는 비용을 줄이는 매력적인 기능처럼 보이지만, Kubernetes 기본 HPA만으로는 바로 설명되지 않는 지점이 있다. replica가 0이 되는 순간 metric 수집과 scaling trigger의 책임이 달라지기 때문이다. 이 글은 KEDA가 HPA와 어떻게 역할을 나누는지 source code까지 따라가며 정리한 기록이다.
Kubernetes에는 기본적인 스케일러로 HPA(Horizontal Pod Autoscaler)가 있다. Scale out, scale in 을 위해 존재하며 pod relica 개수를 조절해준다.
이를 조절하는 기준으로 yaml 혹은 api 등으로 명시한 resource metric(CPU, memory 등) 이 target utilization 과의 상하여부를 따져 한다.
간단한 yaml 을 살펴보자.
구현하면서 확인한 흐름
apiVersion: autoscaling/v2
kind: HorizontalPodAutoscaler
metadata:
  name: example-hpa
spec:
  scaleTargetRef:
    apiVersion: apps/v1
    kind: Deployment
    name: example-deployment
  minReplicas: 2
  maxReplicas: 10
  metrics:
    - type: Resource
      resource:
        name: cpu
        target:
          type: Utilization
          averageUtilization: 80
이런 식의 HPA에서는 Resource인 cpu가 80을 넘을 시 replica가 하나 생성되고, 내려갈 시 하나가 사라지는 방식이라고 보면 된다.
물론 이런 cpu 계산이 여러 개의 pod들이 있음에도 어떻게 이루어지는지 궁금해진다.
이는 아래 형태의 식을 통해 계산된다.
desiredReplicas = ceil[currentReplicas * (currentMetricValue / targetMetricValue)]가령, 현재 4개의 replica가 존재하며 80%의 averageUtilization을 선언했으며, 현재 pod 들의 평균 cpu 가 120%라고 가정하자.
desiredReplicas = ceil[4 * (120 / 80)] = ceil[6] = 6 replicas위의 수식을 적용하면, 4개에서 6개의 replica로 scale out 되어야 함이 도출된다.
이와 같이 HPA를 잘 사용하던 와중, 문득 resource 사용량이 전혀 없는 새벽의 개발/릴리즈서버에서는 replica 개수를 0으로 줄이는게 경제적이라는 생각을 했다. 그래서 minReplica를 0으로 두고 적용해본 결과, 1 미만으로는 replica개수가 절대 줄어들지 않았다.
오픈소스 프로젝트의 가장 큰 장점은 source code를 직접 확인할 수 있다는 점이다. 그래서 k8s HPA code를 따라가 보았다.
func startHPAControllerWithMetricsClient(ctx context.Context, controllerContext ControllerContext, metricsClient metrics.MetricsClient) (controller.Interface, bool, error) {

	hpaClient := controllerContext.ClientBuilder.ClientOrDie("horizontal-pod-autoscaler")
	hpaClientConfig := controllerContext.ClientBuilder.ConfigOrDie("horizontal-pod-autoscaler")

	// we don't use cached discovery because DiscoveryScaleKindResolver does its own caching,
	// so we want to re-fetch every time when we actually ask for it
	scaleKindResolver := scale.NewDiscoveryScaleKindResolver(hpaClient.Discovery())
	scaleClient, err := scale.NewForConfig(hpaClientConfig, controllerContext.RESTMapper, dynamic.LegacyAPIPathResolverFunc, scaleKindResolver)
	if err != nil {
		return nil, false, err
	}

	go podautoscaler.NewHorizontalController(
		ctx,
		hpaClient.CoreV1(),
		scaleClient,
		hpaClient.AutoscalingV2(),
		controllerContext.RESTMapper,
		metricsClient,
		controllerContext.InformerFactory.Autoscaling().V2().HorizontalPodAutoscalers(),
		controllerContext.InformerFactory.Core().V1().Pods(),
		controllerContext.ComponentConfig.HPAController.HorizontalPodAutoscalerSyncPeriod.Duration,
		controllerContext.ComponentConfig.HPAController.HorizontalPodAutoscalerDownscaleStabilizationWindow.Duration,
		controllerContext.ComponentConfig.HPAController.HorizontalPodAutoscalerTolerance,
		controllerContext.ComponentConfig.HPAController.HorizontalPodAutoscalerCPUInitializationPeriod.Duration,
		controllerContext.ComponentConfig.HPAController.HorizontalPodAutoscalerInitialReadinessDelay.Duration,
	).Run(ctx, int(controllerContext.ComponentConfig.HPAController.ConcurrentHorizontalPodAutoscalerSyncs))
	return nil, true, nil
}
HPA controller를 생성하는 구간이 보인다. 여기에서 NewHorizontalController로 들어가면,
replicaCalc := NewReplicaCalculator(
    metricsClient,
    hpaController.podLister,
    tolerance,
    cpuInitializationPeriod,
    delayOfInitialReadinessStatus,
)
이런게 눈에 띄는데, 간단히 필드들을 살펴보면,
metricsClient : CPU 혹은 memory util 을 가져와 취합하기 위한 클라
podLister : 실제 pod 의 현재 readiness, health 등의 pod metric을 가져오기 위한 클라
tolerance : replica 개수 계산 시에 이 숫자를 넘어야 scaling이 됨
cpuInitializationPeriod : pod 이 최초 생성되었을 때 cpu 가 불안정함으로 이 기간에는 계산에서 제외시킴
delayOfInitialReadinessStatus : pod을 계산에서 제외하는 값이 아니라, HPA가 replica scaling을 보류하는 기간이다
이제 replica_calculator.go 의 GetResourceReplicas function으로 들어가보면, 마지막에 어떻게 replica 개수가 계산되는지 자세히 볼 수 있다.
// re-run the utilization calculation with our new numbers
newUsageRatio, _, _, err := metricsclient.GetResourceUtilizationRatio(metrics, requests, targetUtilization)
if err != nil {
    return 0, utilization, rawUtilization, time.Time{}, err
}

if math.Abs(1.0-newUsageRatio) <= c.tolerance || (usageRatio < 1.0 && newUsageRatio > 1.0) || (usageRatio > 1.0 && newUsageRatio < 1.0) {
    // return the current replicas if the change would be too small,
    // or if the new usage ratio would cause a change in scale direction
    return currentReplicas, utilization, rawUtilization, timestamp, nil
}

newReplicas := int32(math.Ceil(newUsageRatio * float64(len(metrics))))
if (newUsageRatio < 1.0 && newReplicas > currentReplicas) || (newUsageRatio > 1.0 && newReplicas < currentReplicas) {
    // return the current replicas if the change of metrics length would cause a change in scale direction
    return currentReplicas, utilization, rawUtilization, timestamp, nil
}

// return the result, where the number of replicas considered is
// however many replicas factored into our calculation
return newReplicas, utilization, rawUtilization, timestamp, nil
그런데 이곳에는 newReplicas 가 0이면 안된다는 어떠한 validation도 찾을 수 없다. 중간중간 나오는 private 함수들을 보았들 때도 마찬가지다.
그렇다면 다시 horizontal.go 로 향해본다.
여기에는
var minReplicas int32

if hpa.Spec.MinReplicas != nil {
    minReplicas = *hpa.Spec.MinReplicas
} else {
    // Default value
    minReplicas = 1
}

rescale := true
logger := klog.FromContext(ctx)

if currentReplicas == 0 && minReplicas != 0 {
    // Autoscaling is disabled for this resource
    desiredReplicas = 0
    rescale = false
    setCondition(hpa, autoscalingv2.ScalingActive, v1.ConditionFalse, "ScalingDisabled", "scaling is disabled since the replica count of the target is zero")
} else if currentReplicas > hpa.Spec.MaxReplicas {
    rescaleReason = "Current number of replicas above Spec.MaxReplicas"
    desiredReplicas = hpa.Spec.MaxReplicas
} else if currentReplicas < minReplicas {
    rescaleReason = "Current number of replicas below Spec.MinReplicas"
    desiredReplicas = minReplicas
}
이런 스니펫이 존재하는데, minReplicas는 사용자가 선언하는 변수 중 하나로, 위에서 제시했던 yaml에는 2로 선언되어 있다. resource metric이 아무리 적어진다 한들, 최소한 minReplicas 개수의 replica는 유지하고 싶다는 뜻이다. 이를 선언하지 않으면 1이 된다는 것을 볼 수 있으며, 0으로 선언할 수 없다는 것은 Spec.MinReplicas에서 확인할 수 있다.
// minReplicas is the lower limit for the number of replicas to which the autoscaler
// can scale down.  It defaults to 1 pod.  minReplicas is allowed to be 0 if the
// alpha feature gate HPAScaleToZero is enabled and at least one Object or External
// metric is configured.  Scaling is active as long as at least one metric value is
// available.
// +optional
MinReplicas *int32 `json:"minReplicas,omitempty" protobuf:"varint,2,opt,name=minReplicas"`
주석상으로 특별한 alpha feature gate를 선언하지 않는 이상 0으로 minReplicas를 선언하지 못함을 알 수 있다. 이후 validate.go에서도 코드상으로 minReplicas가 0이 될 수 없음을 확인할 수 있다.
func validateMetrics(metrics []autoscaling.MetricSpec, fldPath *field.Path, minReplicas *int32) field.ErrorList {
    allErrs := field.ErrorList{}
    hasObjectMetrics := false
    hasExternalMetrics := false

    for i, metricSpec := range metrics {
       idxPath := fldPath.Index(i)
       if targetErrs := validateMetricSpec(metricSpec, idxPath); len(targetErrs) > 0 {
          allErrs = append(allErrs, targetErrs...)
       }
       if metricSpec.Type == autoscaling.ObjectMetricSourceType {
          hasObjectMetrics = true
       }
       if metricSpec.Type == autoscaling.ExternalMetricSourceType {
          hasExternalMetrics = true
       }
    }

    if minReplicas != nil && *minReplicas == 0 {
       if !hasObjectMetrics && !hasExternalMetrics {
          allErrs = append(allErrs, field.Forbidden(fldPath, "must specify at least one Object or External metric to support scaling to zero replicas"))
       }
    }

    return allErrs
}
그런데 alpha feature gate 는 아직 오픈소스에 도입되지 않은, unstable한 실험적 기능을 위해 있는 설정이다. 결국 상용에서 k8s만을 사용할 때 minReplicas 개수를 0으로 줄일 수 없음을 뜻한다.
여기에서 나오는게 Keda인데, k8s와 마찬가지로 CNCF graduate project이며, HPA대용으로 널리 사용되는 스케일러이다.
’대용’에서 알 수 있듯, HPA와 Keda를 동시에 선언하는 것은 불가능하다.
결과를 어떻게 검증했는가
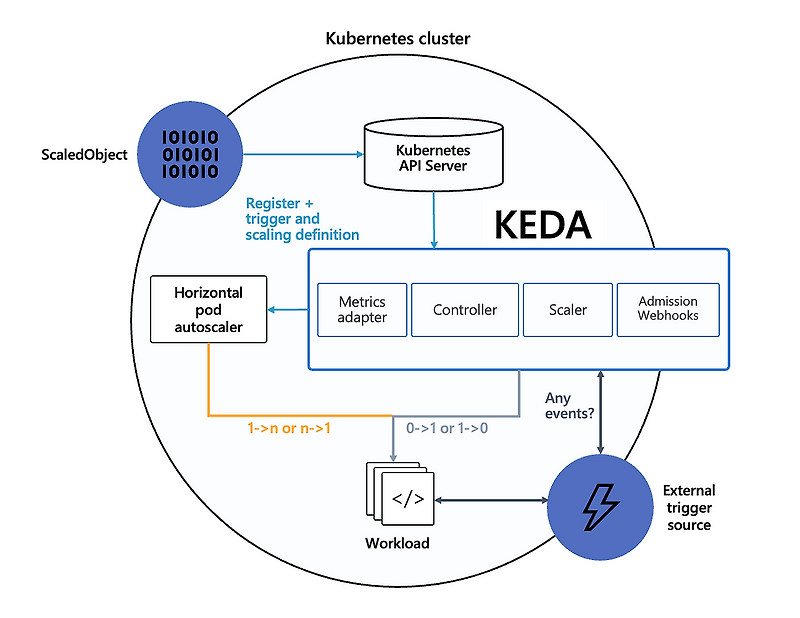
Keda를 이해하기 위한 핵심적인 플로우 이미지이다. 가장 중요한 부분은 Keda는 replica 개수를 0->1, 1->0 로 조절하는 것을 담당하며, HPA가 나머지를 담당한다는 것이다. 자세한 것은 Keda docs에서 찾아볼 수 있다.
다음은 pod replica를 0으로 만들 수 있는 yaml 파일이다.
{{- if or (eq .Values.env "develop") (eq .Values.env "release") }}
apiVersion: keda.sh/v1alpha1
kind: ScaledObject
metadata:
  name: some-application-{{ .Values.env }}-scaledobject
  namespace: some-application
spec:
  scaleTargetRef:
    apiVersion: apps/v1
    kind: Deployment
    name: some-application-{{ .Values.env }}
  cooldownPeriod: 300
  minReplicaCount: 0
  maxReplicaCount: 10
  triggers:
    - type: cron
      metadata:
        timezone: Asia/Seoul
        start: "30 08 * * *"
        end: "30 19 * * *"
        desiredReplicas: "1"
    - type: memory
      metricType: Utilization
      metadata:
        value: "90"
{{- end }}
운영 기준
KEDA를 쓰면 replica 0이 가능해진다는 말만으로는 부족하다. 어떤 scaler가 event를 감지하고, 언제 HPA가 다시 개입하며, minReplicas가 어디에서 보장되는지 알아야 운영에서 예상치 못한 cold start와 scale gap을 줄일 수 있다. 비용 최적화는 항상 동작 의미와 함께 봐야 한다.
우선 개발/릴리즈 pod들만 0으로 스케일링하기 때문에 Values 등의 템플릿에 환경을 선언하여 가져다 쓰면 편리하다.
HPA에서도 볼 수 있었던 minReplicas, maxReplicas가 상이한 변수명으로 선언되어 있고, cooldownPeriod 라는 변수도 있다. 이는 폭발적인 트래픽 등 급격한 resource 의 변동 감지시 잠깐 안정화될 때까지 기다려주는 시간이라고 보면 된다.
Keda에서 가장 중요한 것이 trigger인데, 방대한 종류의 trigger사용이 가능하다. 가령 cloudwatch 상에서 로그 수집이 적어질 때 pod 개수를 조절할 수도 있고, prometheus의 커스텀 메트릭을 사용한 조절도 가능하다.
초기 목표가 특정 시간에 pod 개수를 0으로 스케일링하는 것이었기에, cron type 의 trigger를 생성하여, 오전 08:30~19:30에 pod 개수를 1로 잡고, 외의 시간에는 선언하지 않는다.
추가로 memory 타입의 trigger도 생성했는데, 이렇듯 여러 개의 trigger가 존재할 시 각 trigger 계산의 최댓값에 해당하는 replica가 생성된다. (https://github.com/kedacore/keda/issues/5078)